A CO2 measuring device belongs in every classroom and in every lecture hall, either purchased or, even better, homemade. Because when we build it ourselves, we learn a lot about physics, biology, chemistry, as well as computer science and can even integrate additional features that hardly any standard device offers. With the onset of Covid-19, we covered the maker’s civic response. More information can be found in the interview by Guido Burger in Make Magazine (Plan C).
The pdf-instruction to be found here (in german) makes the self-construction of a CO2 traffic light with standard components from the Maker need possible. No soldering work is necessary. The result is a finished system with LCD display that can later be extended with IoT functions or other displays. The aim is to reduce fear of contact with the technology, explore MINT backgrounds and try out your own creative ideas. Those who are only interested in the pure CO2 measurement value are better off buying a ready-made CO2 traffic light from the wide range of products on the world market.
Similar to the "mouth and nose covers" or the self-sewn "community masks", a self-produced product is not a medical device or a product of personal protective equipment in the sense of the legislation.
A self-made traffic light consists of the same components as professional systems, but logically does not have any certification. This should be considered especially by those who now see the sale of CO2 traffic lights based on our ideas as a business model. We would also like to point out once again the urgent need for an adequate MINT education for the preservation of Germany as a business location. The IoT2 Workshop is a voluntary grassroots project driven by this motivation and is happy to receive donations to support our work. Open source does not automatically mean free commercial use.
Preparation - what do I need?
The hardware is available in different maker stores (mouser.de, exp-tech.de, watterott.com, makershop.de). (Total costs approx. 100 €).
3. required software
All in one ZIP file with quick start guide. The necessary graphic program blocks can be easily puzzled together and extended in a playful way. Examples to try out can be found in the ZIP file under IoTW\Examples\CO2_Ampel\

Please note: Information will be sent to Youtube/Google as soon as you start the video. For further information visit Google Privacy.

Please note: Information will be sent to Youtube/Google as soon as you start the video. For further information visit Google Privacy.

The sensor is pre-calibrated at the factory, but the accuracy (approx. +- 60 ppm, drift approx. 80 ppm / year) may change e.g. due to mechanical effects during transport. Of course we want to be able to rely on the displayed measured values. We can only achieve this if we calibrate our sensor before the first use and then annually on site. For this we need this manual, some time and (windless) fresh air as reference gas. If you also want to compensate the drift, you have to calibrate more often. Only for this purpose is it worthwhile to install an optional calibration button. More about theory and recommendations for calibration frequency here.
Installation location: The Federal Environment Agency makes the following recommendation for schools: "The devices are best placed at breathing height (approx. 1.5 m for seated persons) and in the middle of the room. It is not advisable to position them near windows or to place them directly along a wall or towards the corridor. It is not absolutely necessary to permanently install a CO2 traffic light in every classroom. Rather, it is sufficient to first rehearse the ventilation behavior in a room with the help of the traffic light, which is then maintained even without the traffic light. Then the CO2-Ampel can be used afterwards in the next classroom.
We add: Not in a draught, not at heat sources, not in the direct vicinity of people (exhaled air).
I don't have the possibility to solder and still want to offer the class a common learning success, but I have no Wifi in the school either?
We also have suitable options for unsupplied sites. Why not set up an intranet yourself, create a web server and then view the measurements in your web browser via the beamer?
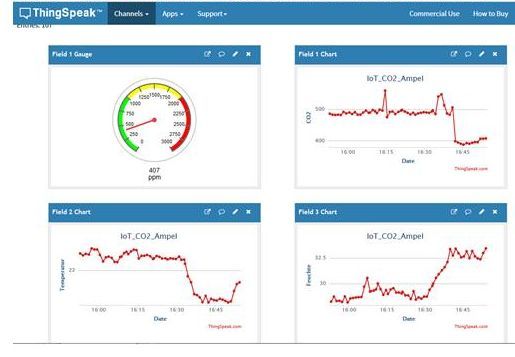
How do I visualize the time courses, how can I store data, exchange them with other classes or offer the janitor a complete overview?
Have you become curious? The possibilities are so diverse that we have outsourced them here.

Please note: Information will be sent to Youtube/Google as soon as you start the video. For further information visit Google Privacy.
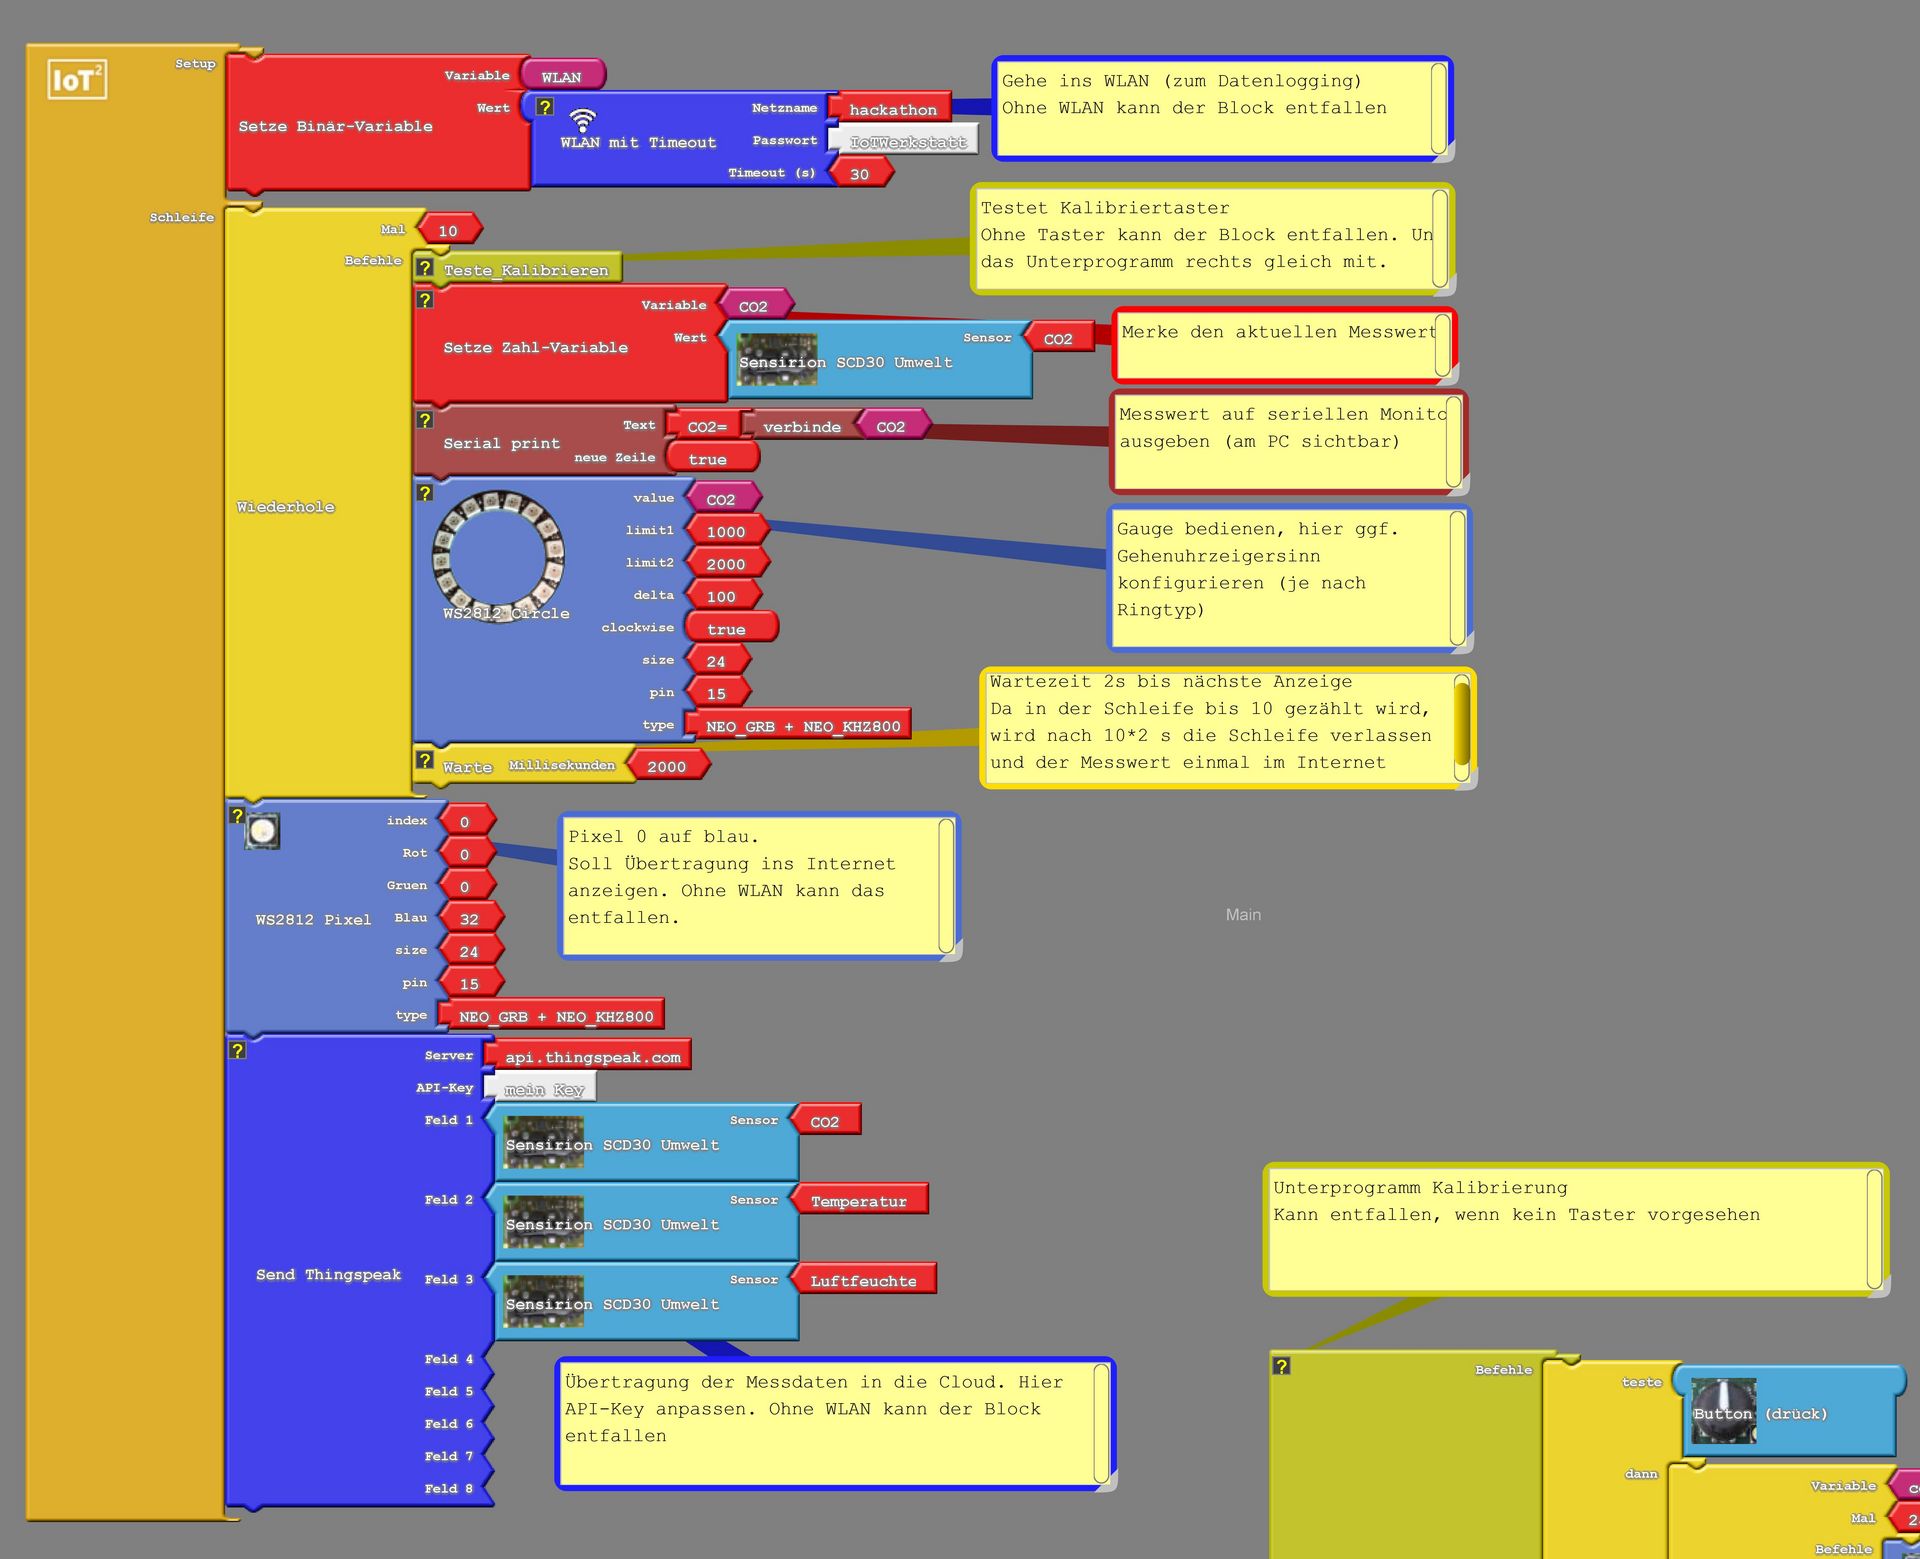
The instructions to be found here enable the extension of our CO2 traffic lights by further display variants. The assembly of the components requires simple soldering skills. The hardware is available in different Maker Shops (costs for one display approx. 20 €). Kick on picture leads to commented example program for a complete traffic light with neopixel ring, internet storage and calibration function.
Preparation - what do I need?
1. Soldering station
2. Required hardware (optionally one of the displays from the list below)
Everyone is responsible for an attractive packaging. Whether laser cut wooden box (files here), or a simple cardboard box, the possibilities are endless. We prefer a mounting (instructions) in the picture frame of a Swedish furniture store. There are A4-frames with a stand and the possibility to let the technique disappear behind the back. A template for the front side can be found here: Attention, depending on the used NeoPixel-Ring there is a variant clockwise and one counterclockwise. Future versions will have the possibility to adjust the direction of rotation by software (clockwise). The holder for the SCD 30 and Octopus can be created by 3D printing.

Please note: Information will be sent to Youtube/Google as soon as you start the video. For further information visit Google Privacy.

Please note: Information will be sent to Youtube/Google as soon as you start the video. For further information visit Google Privacy.
You are leaving the official website of Trier University of Applied Sciences